This week we’re going to really show off how easy it is to “roll our own” algorithms in Apache Mahout by looking at Eigenfaces. This algorithm is really easy and fun in Mahout because Mahout comes with a first class distributed stochastic singular value decomposition Mahout SSVD.
This is going to be a big job, and assumes you are have HDFS, and a small cluster to work with. You may be able to run this on your laptop, but I would recommend following the last post on setting up a small cloud-based hadoop cluster with Apache Zeppelin.
Eigenfaces are an image equivelent(ish) to eigenvectors if you recall your high school linear algebra classes. If you don’t recall: read wikipedia otherwise, it is a set of ‘faces’ that by a linear combination can be used to represent other faces.
Step 1. Get Data
The first thing we’re going to do is collect a set of 13,232 face images (250×250 pixels) from the Labeled Faces in the Wild data set.
Because some of these shell commands take a little while to run, it is worth taking a moment to set shell.command.timeout.millisecs in the sh interpreter to 600000.
My first paragraph, I’m going to make a directory for my final eigenface images that Zeppelin’s HTML loader can use. Then I’m going to download and untar the dataset. Finally, I’ll put the dataset into the tmp folder in HDFS.
%sh

mkdir zeppelin-0.7.0-SNAPSHOT/webapps/webapp/eigenfaces

wget http://vis-www.cs.umass.edu/lfw/lfw-deepfunneled.tgz
tar -xzf lfw-deepfunneled.tgz
hdfs dfs -put /home/guest/lfw-deepfunneled /tmp/lfw-deepfunneled
Step 2. Add dependency JARs
We use the Scala package scrimage to do our image processing, so we’ll want to add those jars. Also, there is a bug we’re working on in Mahout where broadcasting vectors doesn’t work so well in shell / Zeppelin mode. To get around this, I have added the transformer I need in custom jar of algorithms I use.
MAHOUT-1892: Broadcasting Vectors in Mahout-Shell
If that issue is still open, you’ll need to clone and build my branch (or make your own jar).
git clone https://github.com/rawkintrevo/mahout
cd mahout
git checkout mahout-1856
mvn clean package -DskipTests
Finally, assuming you are using Big Insights on Hadoop Cloud, you’ll need to copy the jar to the cluster.
scp algos/target/mahout-algos_2.10-0.12.3-SNAPSHOT.jar username@bi-hadoop-prod-XXX.bi.services.us-south.bluemix.net:/home/guest/mahout-algos_2.10-0.12.3-SNAPSHOT.jar
Changing username to your username and bi-hadoop-prod-XXX.bi.services.us-south.bluemix.net to your server address.
Back in Zeppelin, load the dependencies:
%sparkMahout.dep

z.load("com.sksamuel.scrimage:scrimage-core_2.10:2.1.0")
z.load("com.sksamuel.scrimage:scrimage-io-extra_2.10:2.1.0")
z.load("com.sksamuel.scrimage:scrimage-filters_2.10:2.1.0")

// add EXPERIMENTAL mahout algos
// https://github.com/rawkintrevo/mahout/tree/mahout-1856/algos
z.load("/home/guest/mahout-algos_2.10-0.12.3-SNAPSHOT.jar")
Step 3. Setup the Mahout Context
This step imports the Mahout packages and sets up the Mahout Distributed Context
%sparkMahout.spark

import org.apache.mahout.math._
import org.apache.mahout.math.scalabindings._
import org.apache.mahout.math.drm._
import org.apache.mahout.math.scalabindings.RLikeOps._
import org.apache.mahout.math.drm.RLikeDrmOps._
import org.apache.mahout.sparkbindings._

@transient implicit val sdc: org.apache.mahout.sparkbindings.SparkDistributedContext = sc2sdc(sc)
Step 4. Create a DRM of Vectorized Images
When doing image processing, we want a Matrix where each image is represented as a vector of numbers, where the number correspond to each pixel.
%sparkMahout.spark

import com.sksamuel.scrimage._
import com.sksamuel.scrimage.filter.GrayscaleFilter

val imagesRDD:DrmRdd[Int] = sc.binaryFiles("/tmp/lfw-deepfunneled/*/*", 500)
       .map(o => new DenseVector( Image.apply(o._2.toArray)
       .filter(GrayscaleFilter)
       .pixels
       .map(p => p.toInt.toDouble / 10000000)) )
   .zipWithIndex
   .map(o => (o._2.toInt, o._1))

val imagesDRM = drmWrap(rdd= imagesRDD).par(min = 500).checkpoint()

println(s"Dataset: ${imagesDRM.nrow} images, ${imagesDRM.ncol} pixels per image")
sc.binaryFiles is the spark way to read in our images. We set out partitioning to 500, and map each image into a scrimage object which drops the color information (we don’t need it for feature mapping) and converts the image to an array of large integers. We scale the integers down, and use the array to create a Mahout DenseVector. Finally we zipWithIndex and then use drmWrap to transform our RDD into a DRM.
Step 5. Subtract Means
IF vector broadcasting in the shell were working (it may be by the time you read this), this is how we would subtract our means.
%sparkMahout.spark

// How you would do this without help
// Doesn't work re BUG: MAHOUT-1892
val colMeansV = imagesDRM.colMeans
val bcastV = drmBroadcast(colMeansV)

val smImages = input.mapBlock(imagesDRM.ncol) {
case (keys, block) =>
      val copy: Matrix = block.cloned
      copy.foreach(row => row -= bcastV.value)
      (keys, copy)
}
We use the .colMeans method to get the colmeans, and then do a mapBlock on the images matrix, subtracting the mean from each image.
Since at the moment the above does not work, here is the hack to do it.
%sparkMahout.spark

// EXPERIMENTAL https://github.com/apache/mahout/pull/246
import org.apache.mahout.algos.transformer.SubtractMean

// Subtract Mean transforms each row by subtracting the column mean
val smTransformer = new SubtractMean()

smTransformer.fit(imagesDRM) // calculuates the column mean
val smImages = smTransformer.transform(imagesDRM) // return new DRM of subtracted means

smImages.checkpoint()
Again, this is only needed as a work around. If you’re interested in how easy it is to package your own functions into a jar- check out the SubtractMean source code
Step 6. Distributed Stochastic Singlar Value Decomposition
Based primarily on Nathan Halko’s dissertation most of the hard part here is done for us.
%sparkMahout.spark

import org.apache.mahout.math._
import decompositions._
import drm._

val(drmU, drmV, s) = dssvd(smImages, k= 20, p= 15, q = 0)
Here k is rank of the output e.g. the number of eigenfaces we want out. p is oversampling parameter, and q is the number of additional power iterations. Read Nathan’s paper or see ssvd docs for more information.
The above will take some time- about 35 minutes on a 5-node Big Insights Cloud Cluster.
drmV will be contain our Eigenfaces (transposed).
drmU will tell us the composition of each face we fed into the algorithm. For example
%sparkMahout

drmU.collect(0 until 1, ::)
yields
{0:-5.728272924185402E-4,1:0.005311020699576641,2:-0.009218182156949998,3:0.008125182744744356,4:0.001847134204087927,5:-0.01391318137456792,6:0.0038760898878500913,7:0.0022845256274037842,8:0.007046521884887152,9:0.004835772814429175,10:0.00338488781174816,11:0.009318311263249005,12:-0.005181665861179919,13:-0.004665157429436422,14:0.003072181956470255,15:-0.01285733757511248,16:0.005066140593688097,17:-0.016895601017982726,18:-0.012156252679821318,19:-0.008044144986630029 ... }
Which implies the first image = .005 * eigenFace1 + -.009 * eigenFace2 + …
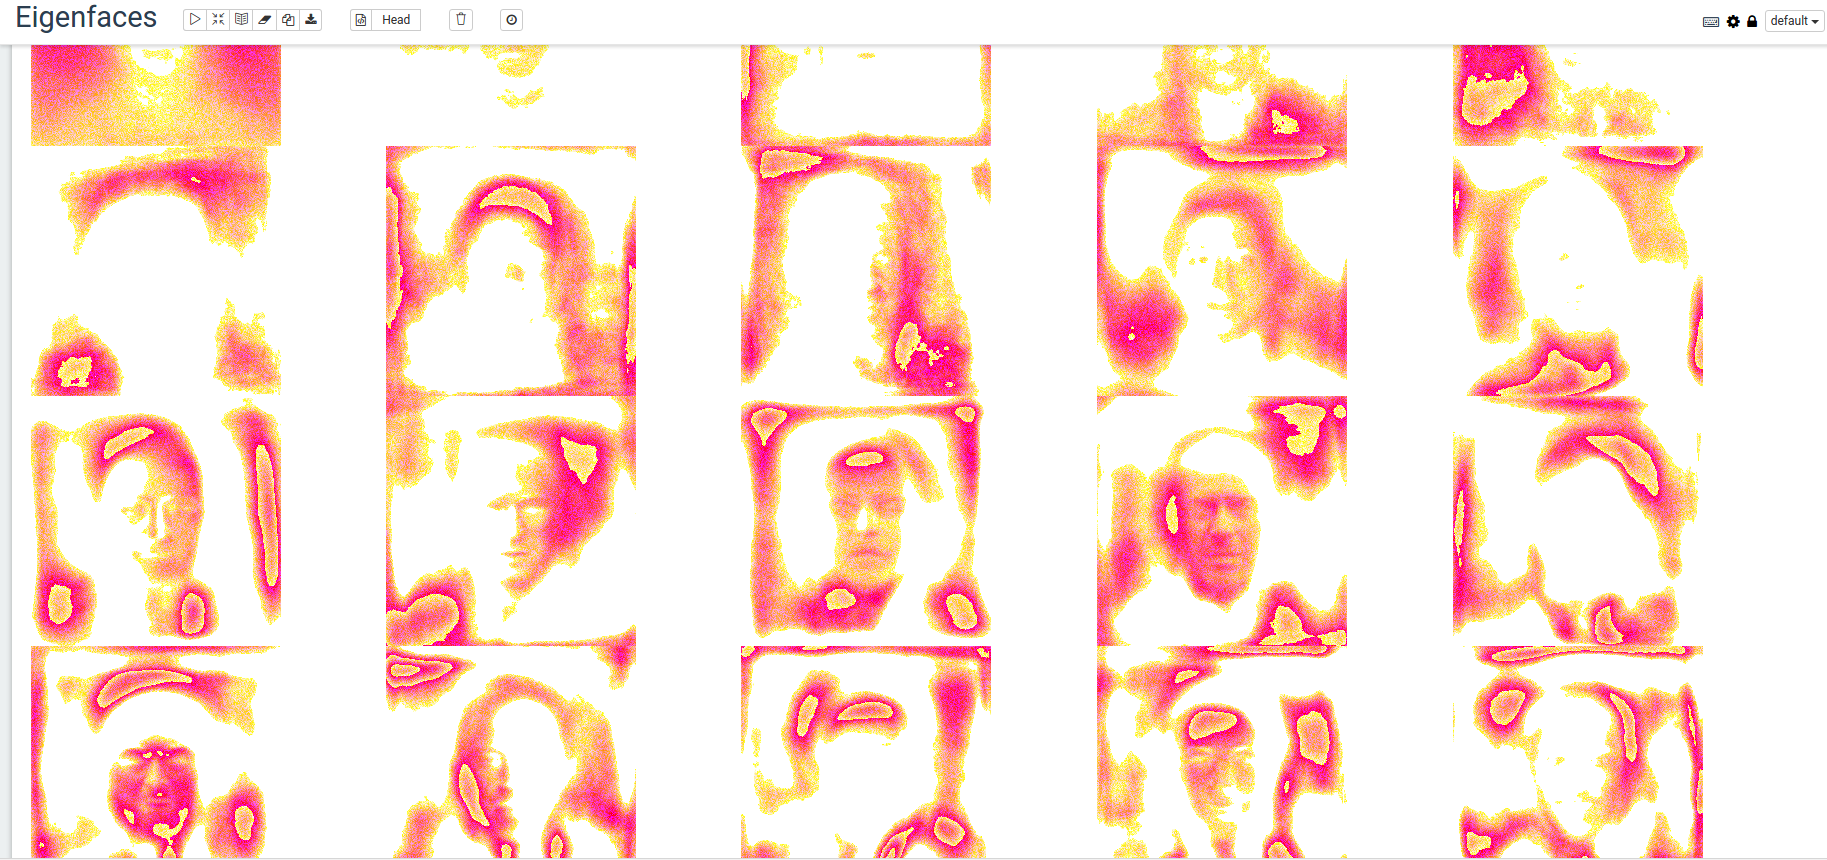
Step 7. Write the Eigenfaces to disk
We want to SEE our eigenfaces! We use scrimage again to help us reconstruct our calculated eigenfaces back in to images.
%sparkMahout.spark

import java.io.File
import javax.imageio.ImageIO

val sampleImagePath = "/home/guest/lfw-deepfunneled/Aaron_Eckhart/Aaron_Eckhart_0001.jpg"
val sampleImage = ImageIO.read(new File(sampleImagePath))
val w = sampleImage.getWidth
val h = sampleImage.getHeight

val eigenFaces = drmV.t.collect(::,::)
val colMeans = smImages.colMeans

for (i <- 0 until 20){
    val v = (eigenFaces(i, ::) + colMeans) * 10000000
    val output = new Array[com.sksamuel.scrimage.Pixel](v.size)
    for (i <- 0 until v.size) {
        output(i) = Pixel(v.get(i).toInt)
    }
    val image = Image(w, h, output)
    image.output(new File(s"/home/guest/zeppelin-0.7.0-SNAPSHOT/webapps/webapp/eigenfaces/${i}.png"))
}
First we load a sampleImage so we can get the height and width. I could have just opened it up in an Image viewer, but y’know, code. drmV has our eigenfaces as columns, so we transpose that. Also recall we subtracted the column means when we in-processed the images, so we’ll need to add that back.
We do a simple for loop over the eigenFaces, basically undoing the inprocessing we did. We then create an array of pixels, we do that by iterating through the vector. Finally we create the image with the width and height, and save it to the directory we set up. ZEPPELIN_HOME/webapps/webapp/ is the root directory for the %html interpreter, so we save our images in a directory there (we created this directory at the beginning).
Step 8. Display the Images
Scala is fun, but for simple string and list manipulation, I love Python
%python

r = 4
c = 5
print '%html\n<table style="width:100%">' + "".join(["<tr>" + "".join([ '<td><img src="eigenfaces/%i.png"></td>' % (i + j) for j in range(0, c) ]) + "</tr>" for i in range(0, r * c, r +1 ) ]) + '</table>'
All that does is create an html table of our images.

And that’s it!
I hope you enjoyed this one as much as I did, please leave comments and let me know how it went for you.

Very well done! Thanks for the easy to follow example of how mahout dstributrd ssvd can be used.
LikeLiked by 1 person