UPDATE 5-23: The world and ecosystem of Big Data evolves quickly. Most of these tools have gone through multiple releases since I first penned this article. I’ve tried to update accordingly. Good hunting.
That title is a lie, probably.
Spark is the hot new thing in big data. Flink will be the hot new thing in big data as internet-of-things, real-time analytics, and other buzz-words go from being stary-eyed promises made in sales pitches to things that actually happen. At the end of the day, most people don’t want to get their hands dirty monkeying around with the mechanics of this stuff, they just want a pretty web interface to use.
So to get paid a gagillion dollars, you basically just start tinkering with this and maybe contribute a bit here and there, then in 2 years when Flink and Spark are the new Microsoft Excel, you’re one of a couple thousand people in the world who have been working with this stuff for over a year. #!/bin/sh (pronounced ‘sha-bang’, more computer jokes, I digress) you’re getting paid a gagillion a year.
Let’s be real. Your proposed analytics stack could do some sci-fi black-magic analytics that perfectly predicts all of your KPIs, lottery numbers, and what color of ChuckTs you should rock with that awesome new dinosaur sweater you just got, but if it doesn’t have a sparkly, friendly, not-scary front-end you’re going to have a hard time getting any traction with it. (If you’re not doing this sort of thing day-to-day, then I’m sorry to say, this is the reality of things: people are inherently uncomfortable with submitting jobs via command line.)
Use Case #2: Having a pretty front end for your Spark / Flink like DataArtisans or DataBricks is nice, but for whatever reason you can’t put your data out on some cloud.

So with out further ado, I present a nice recipe for setting up Apache Flink, Apache Spark, and Apache Zeppelin(incubating) in big-boy mode. (big-boy mode: Zeppelin comes pre-packaged with Flink and Spark, but you want to be pointing at full blown clusters of both of these because, y’know, science).
Ingredients:
- A machine, real or virtual
- Ubuntu Server 14.04.3 LTS
- git
- openssh-server
- maven version 3.1+
- jdk 1.7+
- Apache Zeppelin
- Apache Flink
- Apache Spark
Prep time: 2 hours.
Skill Level: Knows just enough to be dangerous
But really, this is a heavily documented (over documented?) recipe. It assumes no familiarity with linux and provides little blurbs and links about what each command is doing. I am an autodidact when it comes to computers and while blindly following recipes is nice for getting something going it doesn’t teach you much and if the slightest thing goes wrong you are totally lost. So proceed with no fear.
Step 0:
Because jebus-only-knows what kind of wierd-o setup any given box could have, I present this recipe on a fishbone (that is minimal install) Ubuntu Server 14.04.3 virtual machine. For demo purposes, this minimizes instances where
- something weird is causing unique problems and
- I miss a dependency because I have it on my computer, but you may not.
There are lots of tutorials on how to install Ubuntu on a virtual machine, but to be honest, if this step scares you, you should plan on this being a full day project or more. It’s really nothing more than a recipe, but you’re going to be doing a lot of learning along the way.
Make sure to setup the virtual box to use a bridged network adapter. A good write up on the differences can be found here. In short, in Oracle VirtualBox go in to the machine Settings -> Networking and select Bridged Adapter from the drop down.
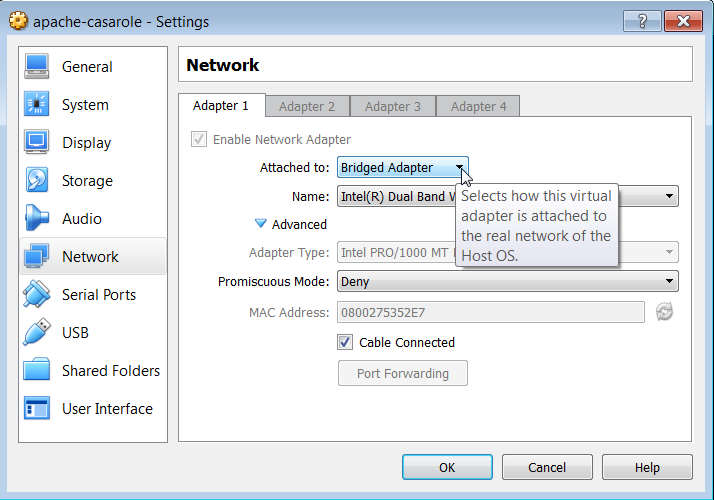
A bridged adapter basically has the fewest restrictions on the virtual machine. We’re going to be installing a lot of things that will be accessing ports on the host machine and this is just going to be a lot simple. If you’re curious go read more.
Gotchya
Throughout this tutorial I’ll point out things that seem trivial but if you variate from the script even slightly can totally derail you. I do this because I am not one to carefully follow directions and provide this information for others like me. In this case, the ‘gotchya’ is if the virtual machine is already running when you change this setting you need to restart the machine for the changes to take affect.
Install Ubuntu 14.04.3
A good tutorial is here.
Gotchya
I only attest to this recipe working on a bare bones Ubuntu 14.04.3 Server installation (the link to exactly what I used is in the ingredients). If you decide to use another version of Ubuntu or flavor of Linux, you may have to tweak some things. Zeppelin, Flink, and Spark are all written in Java/Scala so theoretically this could be done on OSX or Windows, but you wouldn’t run a cluster on Windows or OSX boxes, and for a number of other reasons, I’ve chosen Ubuntu 14.04.3. Get this working then try to do something weird if you want.
Step 1- Prepping the Box
Some basic applications that will be required by the programs we are going to use. Software in Ubuntu is managed via apt. Generally speaking there are three ways to get software.
- Download from the repository
- Download binaries directly
- Download and compile from source
In this episode, we’ll be doing all three. If you’re coming from windows and used to everything being pre-compiled for you with a nice pretty GUI installer… I don’t know what to tell you, other than ‘Welcome to Linux, this is life now.’
Any time you see the sudo apt-get we are telling the computer:
sudoliterally: super user doapt-get installuse the package manager to install the requested software.
So we are using apt-get to install:
git
git is a program for software version control. We’ll be using to download the latest source code for programs we’re going to compile.
sudo apt-get install git
openssh-server
A basic Secure Shell server.
sudo apt-get install openssh-server
OpenJDK 7
The Java Development Kit version 7.
sudo apt-get install openjdk-7-jdk openjdk-7-doc openjdk-7-jre-lib
But Maven 3+ isn’t in the repository at the time of this writing. That is to say, if we use apt-get we will get a version of maven that is to old for what we need. So for maven, we are going to download a binary distribution and manually copy it into place.
Maven 3.1+
In the same way apt-get is a neat way to manage software which is kept in a repository, maven manages code libraries for us. Check out https://maven.apache.org/ for more info.
If you already have maven installed, we can use apt to remove software as well as install it.
sudo apt-get purge maven maven2
*note if you don’t have maven installed, this command isn’t going to hurt anything, you’re just going to see an error message about how there was nothing to uninstall.
Installing maven 3.3.3 quick and dirty
Download the maven 3.3.3 binary
wget is a CLI (command line interface) downloader.
wget "http://www.us.apache.org/dist/maven/maven-3/3.3.3/binaries/apache-maven-3.3.3-bin.tar.gz"
Unzip the binary (tar -zxvf) and then move (sudo mv) it to /usr/local
tar -zxvf apache-maven-3.3.3-bin.tar.gz
sudo mv ./apache-maven-3.3.3 /usr/local
Finally, create a symbolic link (ln -s) from /usr/bin to the new version. /usr/bin is one of the places Ubuntu looks for programs by default.
sudo ln -s /usr/local/apache-maven-3.3.3/bin/mvn /usr/bin/mvn
Installing Zeppelin
At the time this article went to press, the main branch of Zeppelin didn’t have support for Flink 0.10 (which at the time of press was the current stable release of Flink). There is a discussion here, but the short version is you either need to hack Zeppelin yourself or use Till Rohrmann’s branch. For parsimony, I present the second method and leave ‘How to hack out Zeppelin’ as content for another post…
First, git clone Apache Zeppelin. This is the third method of getting software discussed earlier. We’re downloading source code to compile.
git clone https://github.com/tillrohrmann/incubator-zeppelin.git
git clone https://github.com/apache/incubator-zeppelin.git
UPDATE 5-23: Originally we wanted to get Flink v0.10 and Till’s branch had this, now the real Zeppelin is updated to branch 1.0, so we got to the (real) source.
change directory (cd) to incubator-zeppelin
cd incubator-zeppelin
A git can have multiple branches. A good overview is here. We want to checkout the branch that Till made with the Zeppelin configuration for flink-0.10-SNAPSHOT.
git checkout flink-0.10-SNAPSHOT
Now we instruct maven (mvn) to clean and package the source found in the directory (more on maven build life-cycles). Additionally we pass flags to maven instructing it to build against Spark version 1.5 (-Pspark-1.5) and to skip the tests that make sure it compiled correctly. See Gotchya below.
UPDATE 5-23: This all seems to be working now. We add flags -Psparkr -Ppyspark -Pspark-1.6 to make Zeppelin build against Spark 1.6 (included since last time), add support for SparkR and support for pyspark. At the time of writing -Dflink.version=1.0 isn’t necessary, but will hopefully keep this working for a little while longer, especially after Flink v1.1 is released.
mvn clean package -DskipTests -Psparkr -Ppyspark -Pspark-1.6 -Dflink.version=1.0
Gotchya:
I explicitly didn’t use the -Pspark-1.5 flag. If I had, it would have built Zeppelin with an internal Spark interpreter at version 1.5. I was having all sorts of issues when doing this, and finally rolled back to make this a simple-as-possible case. If you want to try your hand at Spark 1.5, then add that flag and in the next section when you install Spark, checkout version 1.5 instead.
The maven build will take a little while (26 minutes for me). When it is done, you should see a message saying BUILD SUCEESS and some statistics.
And finally…drumroll… the moment you’ve all been waiting for … start the Zeppelin daemon.
sudobin/zeppelin-daemon.sh start
Gotchya
You must use sudo when you start the zeppelin deamon. The onus is on you to remember to do this. It is absolutely possible to start the daemon without sudo and you will be able to run the Flink example listed below, however the Spark example won’t work. The Zeppelin internal Spark interpreter needs super user privileges for creating databases and other various writes.
UPDATE 5-23: Don’t use sudo . If you do it once, you’ll have to do it always, and having Zeppelin running as super user is unwise and unnecessary.
Test flight of our new Zeppelin…
First determine the local IP address of the machine hosting Zeppelin.
ifconfig
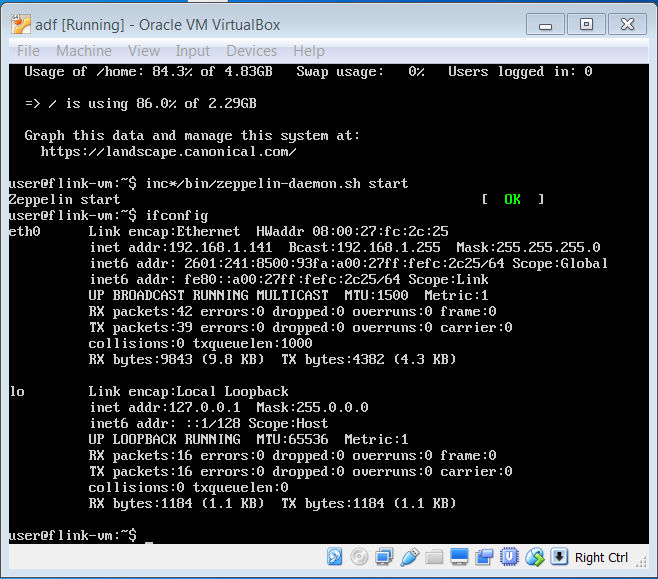
See that the IP of my machine is 192.168.1.109, yours will be different. In subsequent screenshots, in the browser address you will see this IP, however for those following along at home, you need to use your own IP address.
Open a browser and surf to http://yourip:8080, where yourip is the IP you found in the inet addr: field under the eth0 section. Port 8080 is the default port of the Zeppelin WebUI.
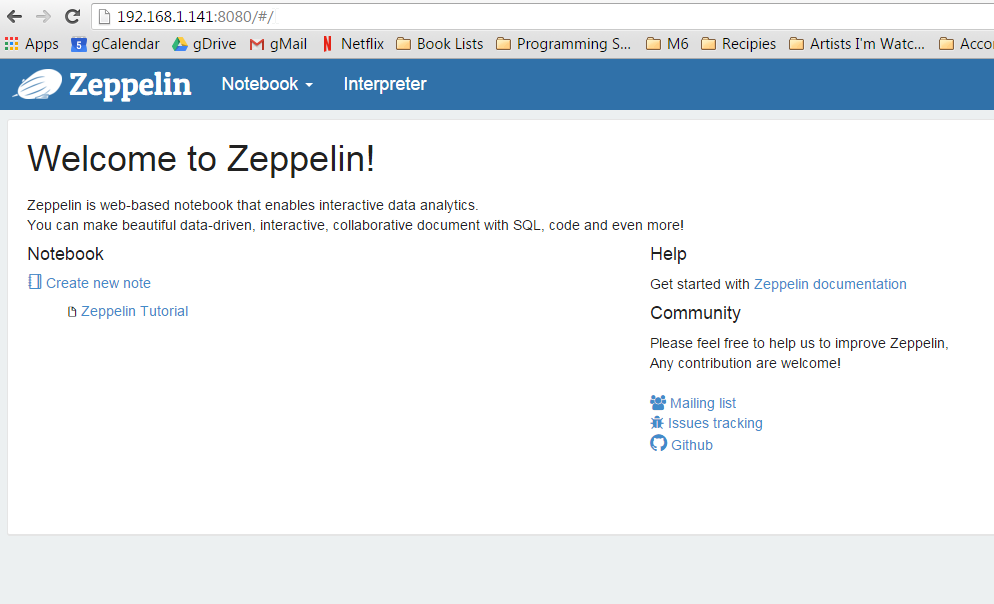
Open the Tutorial Notebook by clicking on Notebook -> Zeppelin Tutorial
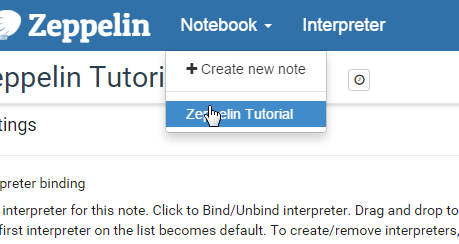
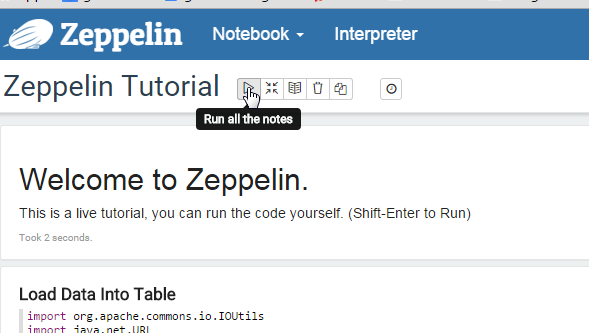
When you open the tutorial notebook it will ask you to bind the interpreters, just do it by clicking save. Now run all of the examples in the notebook to make sure they are working. You can do this by going to each cell and clicking Shift+Enter or by clicking the little play button at the top of the note.
Now we are going to do a couple of simple examples in Flink and Spark. Zeppelin comes pre-built with its own Flink and Spark interpreters, and will use these until we have it pointed at our own cluster (which happens later). For now, we’re going to test some basic functionality of Zeppelin by running a Flink and a Spark word count example against the internal interpreters.
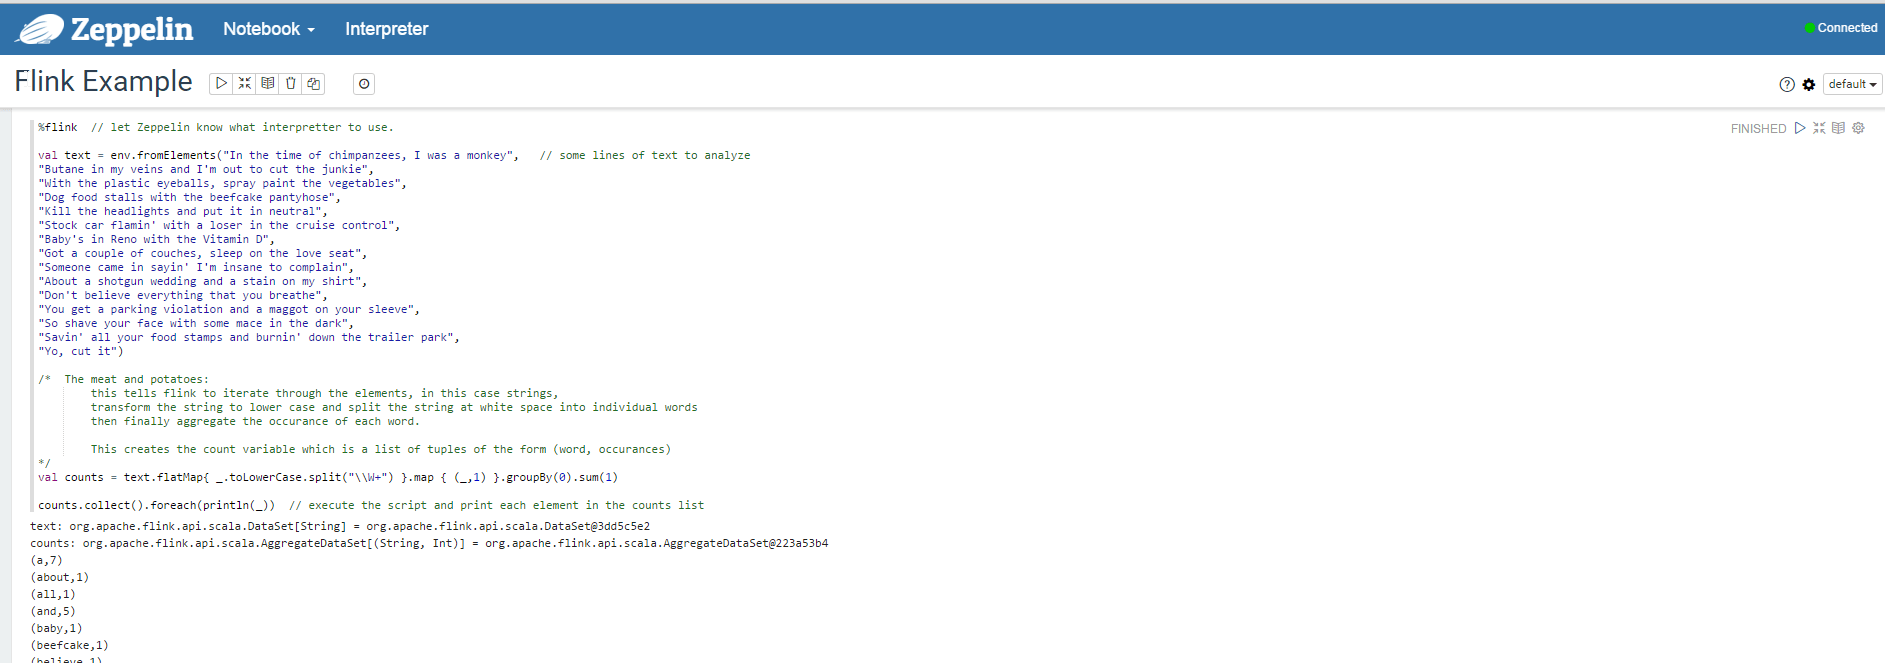
Flink Example
First, create a new notebook. Do this by clicking on Notebook -> Create New Notebook. Name this notebook “flink example”. Zeppelin doesn’t automatically open the notebook you’ve created, you’ll have to click on Notebook again and the name you gave the new notebook will appear in the list.
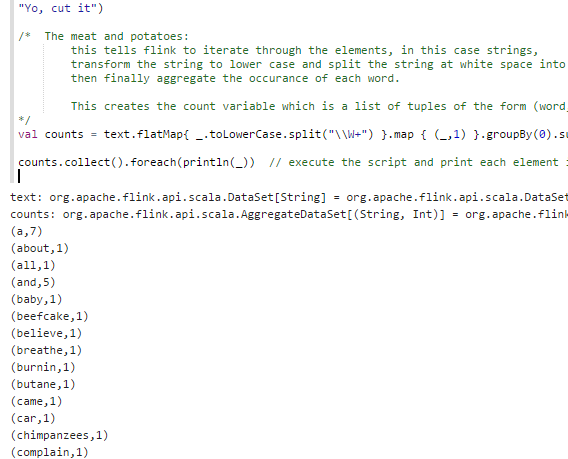
You can find a Flink word count gist here. Copy and paste the code from the gist into the Zeppelin note and either hit Shift+Enter or click the play button to run the paragraph.
Spark Example
Create another new notebook, call this one “spark example”, and open it.
Copy and paste the gist from here.
Assuming your examples are working go ahead and stop Zeppelin.
bin/zeppelin-daemon.sh stop
Installing Flink and Spark Clusters
There are lots of how to guides for getting full blown Flink and Spark clusters set up. For this example, we’re just going to install a stand alone of each. The important thing in this tutorial is how to get Zeppelin aimed at Flink and Spark instances outside of the ones that come prepackaged. These external versions can be scaled/built/setup to suit your use case.
Download, checkout, and start Flink
Download
We change directory back to our home directory
cd $HOME
Then clone the Apache Flink repository
git clone https://github.com/apache/flink.git
Then check out release-0.10 1.0
git checkout release-0.10
git checkout release-1.0
UPDATE 5-23: We’re on release 1.0 now. Release 1.1 (which is what the master branch is on has some cool new stuff like streaming in the shell, but will also break backwards compatibility, e.g. it won’t work). I have a PR that makes it work, but I’ll save that for a future blog post.
And finally, build the package.
mvn clean package -DskipTests
Building Flink took 20 minutes on my virtual box.
Start Flink
Now start Flink with the following command:
build-target/bin/start-cluster.sh
Now go to http://yourip:8081 and check out the Flink web-ui.
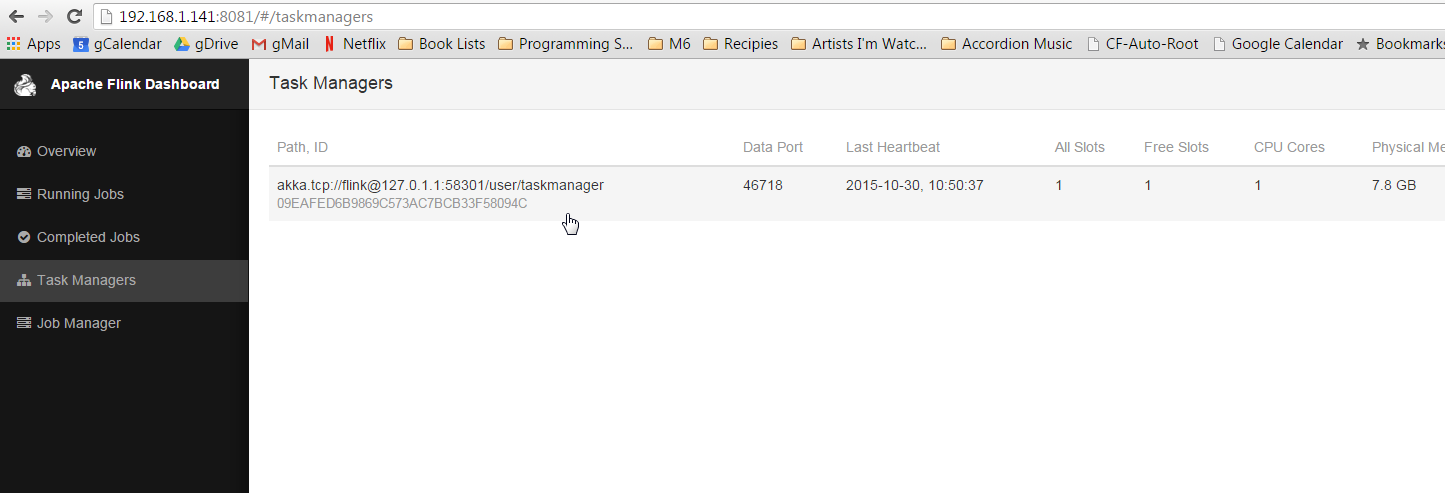
Make sure there is something listed under the task manager. If there is nothing stop and restart the flink cluster like this:
build-target/bin/stop-cluster.sh
build-target/bin/start-cluster.sh
Download, checkout, and start Spark
Download
We change directory back to our home directory
cd $HOME
Then clone the Apache Spark repository
git clone https://github.com/apache/spark.git
Then check out branch-1.4 1.6
git checkout branch-1.4
git checkout branch-1.6 -Psparkr
UPDATE 5-23: We’re on branch 1.6 now, and we want SparkR support.
And finally, build the package.
mvn clean package -DskipTests
Building Spark took 38 minutes on my virtual box.
Start Spark
In a cluster, you have a boss that is in charge of distributing the work and collecting the results and a worker that is in charge of actually doing the work. In Spark these are referred to as the master and slave respectively.
In Flink we could start an entire stand alone cluster in one line. In Spark, we must start each individually. We start the master with a flag --webui-port 8082. By default the webui-port is 8080, which is already being used by Zeppelin.
sbin/start-master.sh --webui-port 8082
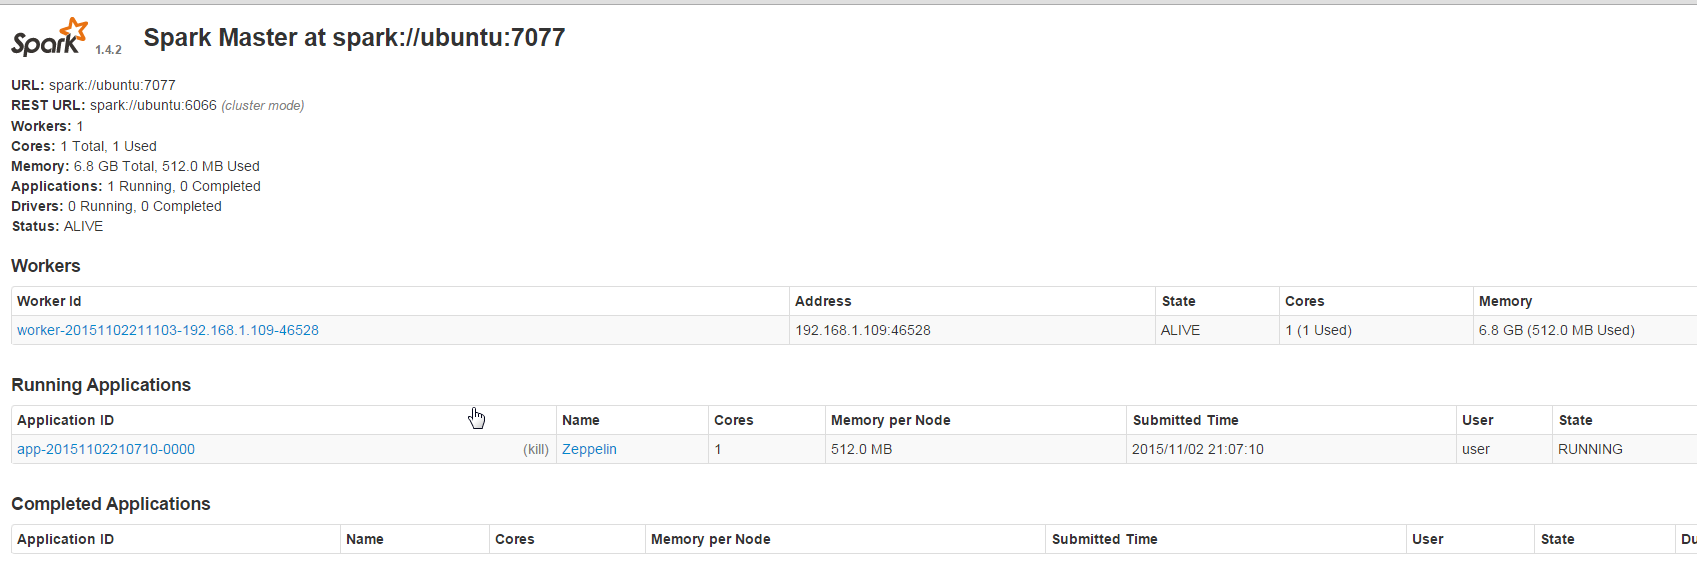
Now go check out the Spark master web-ui. It will be at http://yourip:8082.
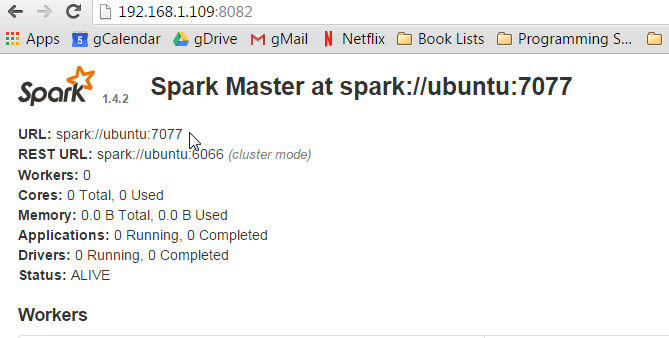
MARKDOWN_HASH61a4bd20fbd00664bbfa5c55f8b64df2MARKDOWN_HASH:7077Note the URL listed. spark://ubuntu:7077. My URL is ubuntu because that is the name of my host. The name of your host will be what ever you set it up as during install. Write this url down, because next we are starting the slave. We have to tell the slave who its master is.
sbin/start-slave.sh spark://yourhostname:7077
The argument spark://yourhostname:7077 lets the slave know who its master is. This is literally the master’s URL. If you have another computer with Spark 1.4 installed you could run this line again (substituting ubuntu for the IP address of the master machine) and add another computer to your cluster.
Gotchya
For those that are not reading carefully and just copying and pasting, you probably won’t see this for a while anyway, but I want to say again, unless you just happen to have named your host ubuntu you need to change that to what ever the name is you found for the Master URL in the Spark Web-UI…
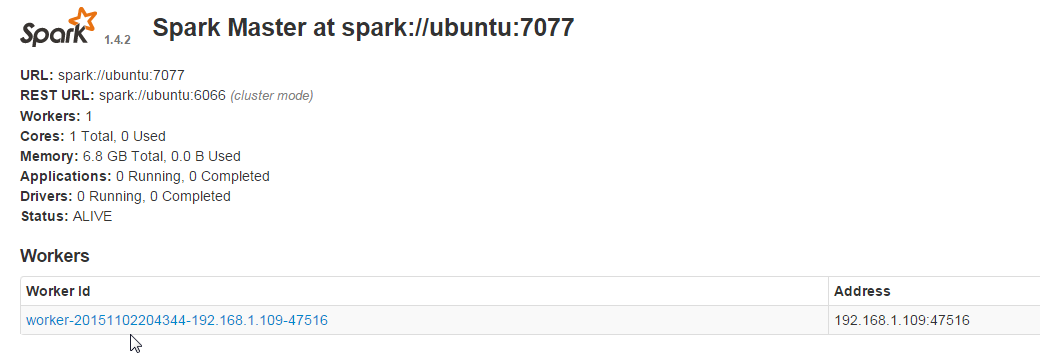
Now go back to your master webui and you should see the slave listed under workers.
Start Zeppelin
Now everything is technically up and running. All we have left to do, is start Zeppelin back up, tell it to run code against our clusters (instead of the internal interpreters), and check that our examples still work.
Start Zeppelin with the following
cd $HOME
incubator-zeppelin/bin/zeppelin-daemon.sh start
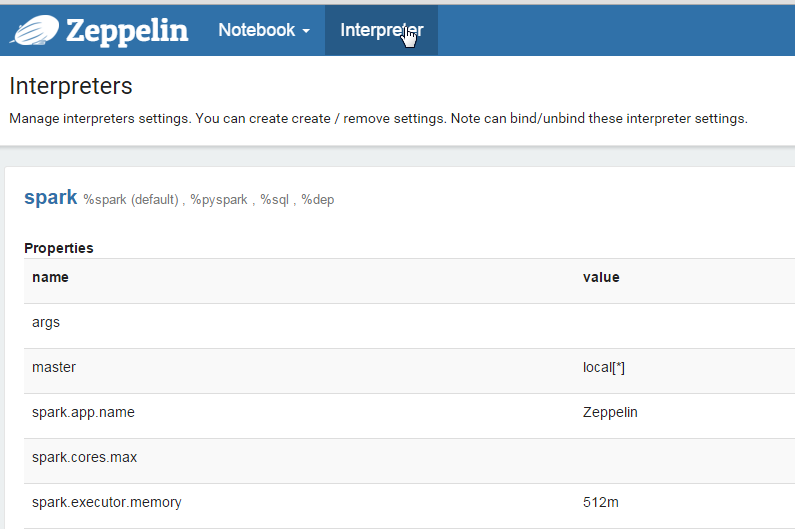
Now go back to the Zeppelin web-ui at http://yourip:8080 and this time click on Interpreters at the top of the screen.
In the Spark section, click the edit button in the top right corner to make the property values editable. The only field that needs to be edited in the Spark interpreter is the master field. Change this value from local[*] to the URL you used to start the slave, mine was spark://ubuntu:7077.
Click ‘Save’, then scroll down to the Flink section. Click ‘edit’ and change the value of host from local to localhost. Click ‘Save’ again.
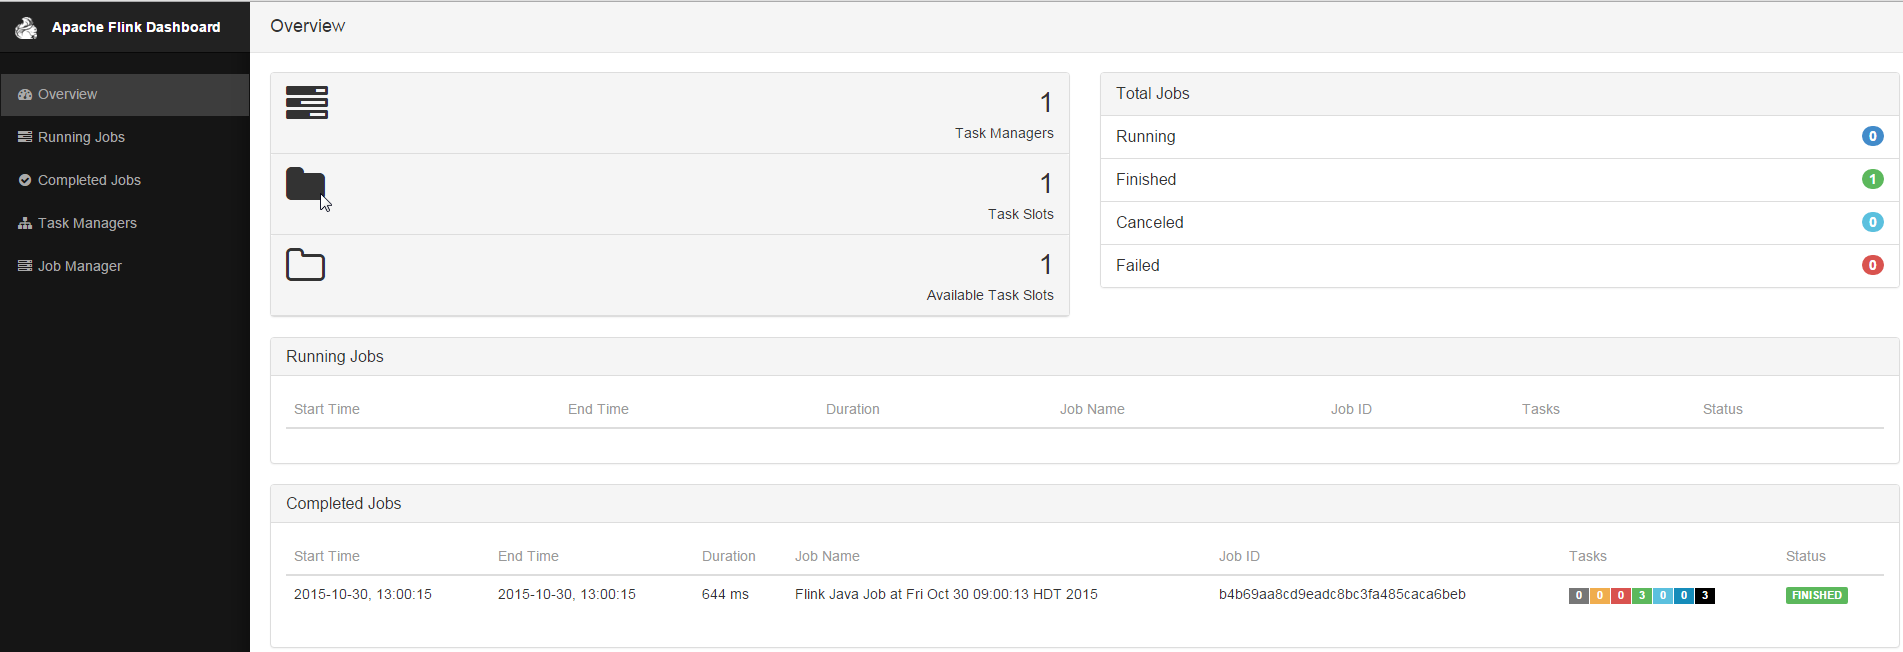
Now open the Flink notebook we made earlier.
Hit Shift+Enter or hit the play button at the top of the notebook to run the paragraphs. Hopefully the result is the same as before. Now in a new tab, go to the Flink Web-UI at http://yourip:8081. You should see the job has completed successfully on the cluster.
Now open the spark example notebook from earlier and rerun this as well. After this notebook has run successfully go to the Spark Web-UI at http://yourip:8082 and see the job has run on this cluster.
Gotchya
if the Spark job seems to hang, go to the Spark Web-UI. If there is a job listed under running applications, but there are no workers listed, the slave has died, go back to the command line and run
cd $HOME
spark/sbin/start-slave.sh spark://yourhostname:7077
where yourhostname is the hostname you have been using for the Master URL this whole time.

Summary
Dude (or dudette), crack a beer. You just set up two of the most cutting edge big data engines available today in a cluster mode with an up-and-coming cutting edge (and pretty) web interface. Seriously, not a trivial task. Have you checked your linkedIn inbox in the last hour? because you probably have about 30 recruiters blowing you up.
Seriously though, It took me a couple of days smashing my head against the wall to make this rig work right and consistently. Seeing as I just saved you so much time, I think the least you could do is head over to, and sign up for, and participate in the user mailing lists for
Open source software is a beautiful thing, but it relies on a strong community. All of the projects, (and many more) could use your help, but especially Zeppelin which is still in incubator status.
(A thank you to the wonderful developers wouldn’t hurt either, they watch the mailing lists).
UPDATE 5-23: I let this go with out updates longer than I should have, and I’m sorry. To be honest, I probably won’t do it again. I’m older and wiser now, the things listed here should remain valid for sometime to come. The big changes are:
- We use the actual Zeppelin branch (not Till’s)
- We build against Flink 1.0
- We build against Spark 1.6 with SparkR support.
- Note, you don’t actually have SparkR support yet. elbamos instructions for SparkR integration.
Happy hacking,
tg

Trevor, thanks for putting this together, it was a great tutorial! I did run into a couple of things, so I’m putting my notes in below to help others.
tl;dr
1) Make a VM w/ 16 GB, 8 GB wasn’t enough space.
2) Build fails? Rerun it, took 2 to 3 tries.
3) Watch your use of sudo!
Longer Version
I had to go into zeppelin-web and compile it independently of the reactor build, then go back and rerun the full reactor build. <– second time through it didn't happen, so maybe something went haywire downloading karma/npm requirements?
flink-example didn't work, saw errors related to Connection Refused from the Thrift layer, assuming that flink wasn't running?
spark-example ran!
Stopping the zeppelin-daemon only works properly if I sudo it.
bin/zeppelin-daemon.sh stop needs to be sudo bin/zeppelin-daemon.sh stop
In section on building flink, you are missing after the git clone the "cd flink". in the previous section on building zeppelin you had that command!
I couldn't get the flink-tests to compile, and didn't have luck working around it. Wait, maybe I did, but removing form the the flink pom the flink-tests module.
Needed to rebuild VM with more space! Ended up adding another dirve.. 8 GB wasn't enough, so added a second 8 GB drive.
Okay, now doing Spark. Took two runs to get it working… First time errored… I think all the dependencies downloading etc make the build in a VM brittle..
When I went back to Zeppelin, it was already running, so I did the restart command. I also did it as sudo, though you didn't have that listed… Honestly, not sure the restart is needed if zeppelin is running, since we just repoint to the started up spark cluster…
LikeLiked by 2 people
@dep4b glad you liked it and thanks for the feed back. I realized that as the projects (Zeppelin, Flink, Spark) develop, this is going to go out of date. I am submitting this tutorial to the Zeppelin site, and will update this blog with a link to that at the top. I think it will be easier and make more sense to just focus on keeping one source up to date, and that is the logical one to focus on.
Your feedback was great- I will be incorporating it in to the post that goes on the Zeppelin site.
Also, re: build failures- yes, you are correct. I have had more headaches than I can count related to dependencies being magically missing. -_- Open source software, whatareya gonna do?
Also, I see you’ve commented on the pull request, so you are tracking the migration. Feel free to contribute to the article once it is up.
LikeLike
I’ve got the Zeppelin up and running, the flink cluster working, but the spark cluster will not build for me. It is the same set of errors with each attempt, occurring during Spark Project Core, running the build for roughly 5 minutes.
It says:
== Expanded type of tree ==
ConstantType(value = Constant(collection.mutable.Map))
uncaught exception during compilation: java.io.IOException
[ERROR] File name too long
[WARNING] 24 warnings found
[ERROR] two errors found
[INFO]—————————————————-
Followed by my build summary, 5 success and a failure then all skipped.
Any ideas?
LikeLike
Hey Mike- sorry to necromance with this reply. I’m not much of a Spark guy, and to be honest that project has gotten so overloaded (and since I’m rarely digging around in the source) I usually just tell people to download binaries anymore. The best I can tell you (e.g. anyone who stumbles across this in the future) is to try rebuilding, google the error, or ask on the Spark User Mailing List, user@apache.spark.org (you’ll need to subscribe first).
LikeLike
Thanks Trevor!
super useful tutorial. I’m using a mac now and have spark and flink running on it. But I will have to revisit this tutorial to automate environment setup on cloud servers.
On another note: do you know very much about the Beam project and how it relates to Flink? If so I’d love to read about it!
LikeLike